Door A Explodah

Mar 15 201911-57 AM - Copy

I dunno why, I glanced at the hinge area of the door. There was some flaky loose bubbly paint there… Gee. Picked at it with my finger and the paint came away pretty easily – in big chunks? Got a screwdriver and scratched it a bit… and it went through the metal. Made a sort of sickly scrunch sound. Like putting a screwdriver into some gravel? Awww… I’ll take the door off and have a look?

Door off, onto sawhorses in the driveway. Scratch a bit more with screwdriver… oh man. I’m going to be sick. Paper bag time. Breathe… gee. I’m going to need a new door. Wondering if I can find a matching color I find some used for $100-$150 but then the shipping is $250+. $400 for a new door? Hmm. For $400, at my beginner welder hourly rate of $0.25/hour, that’s 1600 hours of welding. I could probably build a whole new truck out of mig blobs in 1600 hours. I put the door back in the truck. I gotta think about this…

Next day I have another look. Gee. This doesn’t look SO bad. Its just metal. I can grind the bad stuff away and replace. Pretty clear though that the POR-15 from previous owner did nothing but hide the problem for a few years… can’t hide from the screwdriver of truth though…

Mar 15 201911-57 AM_1 - CopyMar 15 201911-58 AM

I take the door back off, get out the grinder. And the mask. And the face shield. Pretty much complete welding attire to protect from the brown cloud that’s about the envelope the area.

Mar 15 201912-28 PM

Most of the outer skin is just gone after grinding. Some of the second layer is gone too. But there’s a ton of good metal around. This is no big deal? I’m generous with the grinder to get to nice thick metal. I am a bit concerned that what I rebuild needs to fit like the old door. The area I need to be most careful about is where the rubber seal hangs on the door. Need to follow the original lines. Otherwise the door won’t door.

Tin snips and jigsaw, I cut out metal, hammer and bend, freehand repair pieces, then glue them into place with my mig.

Mar 16 20193-04 PMMar 16 20193-20 PM

Having nobody to show me how this is done I get to experiment with a bunch of different techniques. The metal is nice and thick and the rust is gone I have no trouble with burn through. Lovely to have a big chunk of metal as a heat sink. The inner layer is soon filled. The other trick is lots of small blobs of metal. Zap-zap-zap. Pointillist style. Like Seurat? Gotta be careful though because its easy to have holes between the points. So sometimes after I’ve got the surface where I want it I’ll draw a bead across, melt it all a bit, then grind it back with grinder.

After I’m satisfied with inner layer I spray it all with zinc primer, then start on the outer layer. I’ve got 16g metal so that’s what I use. Even though the door is thick metal, the 16g is much thicker. I cut pieces to rougly the right shape, then grind down until they fit like my eye says they should. Weld one edge into place, then hammer the piece until another edge is in place. Eventually the piece is welded flush. Pretty neat!

Mar 16 20194-56 PMMar 16 20195-59 PMMar 16 20195-59 PM_1Mar 16 20196-00 PM

End of the day I hose it all down with zinc primer. Tomorrow I’ll be done!

Mar 16 20196-19 PMMar 17 20199-41 AMMar 17 201910-47 AMMar 17 201910-47 AM_1Mar 17 201910-48 AMMar 17 201911-20 AMMar 17 201911-31 AM

This was a pretty interesting process, build up with mig, then grind down. In one section I had too many pin holes, I needed more heat. So finally I cranked slowly across the whole area real slow, drew a huge fat bead. That did the trick.

What this process taught me is that no matter what, I can just grind all this muck away in the future and do it again. If there’s corrosion, if it starts to come apart, etc, if it looks at me funny… I can grind it away and do it again. I’m empowered!

Mar 17 201912-50 PM

Last little bit went real slow. I used a bright light to see any pits or holes, fill them with weld blob, then grind down. Weld it all, grind it all, find more pits, repeat. But finally it was good enough. Hosed it all down with vht suspension paint:

Mar 17 201912-56 PM

This maybe took me 10 hours of work? I reinstalled the door. It is lovely to see, smooth to the touch. The black paint isn’t really notable.

Most frustrating thing though… this is the best most complex work I’ve done and its pretty much invisible to anyone. I gotta open the door and point them into the hinge area and even then it isn’t really clear how much new metal is there.

Anyway. Now the driver’s door is looking at me funny. Looks like a lesser version of the same issue. Wonder how much easier it will go with my new skillz?

Child Labor: Installing the Transfer Case Skid Plate

Cleaning in the garage, wife asks what this pile of metal is doing in the corner.

Well hon, its like this… uh… yeah… they go on the truck? Yeah, sure, I’ll get them out of here. No problem?

I have the bolts, I guess its as good as time as any to put the sucker on. Hey, and an opportunity for my little one to make some money helping dad with the truck.

This skid plate bolts to the frame right below the transfer case. It protects the transfer case from debris. I’ve already painted it with POR15, only thing left is to install it.

The first step is to paint the entire top side of the skid plate with Fluidfilm, since I won’t be seeing that surface again for a while. Little one does a fine job.

Second, we chase the threads in the frame with a tap. This because the previous owner had coated the frame with epoxy. Without doing this it was impossible to screw the bolts into the frame.

Skid Plate held in place with car jack, little one tightens the bolts.

Skid Plate held in place with car jack, little one tightens the bolts.

Third, we hold up the skid plate with a car jack and screw in the bolts. Little one is good at this.

D7000_2013_08_10-12_57_26_jpg D7000_2013_08_10-12_58_36_jpg D7000_2013_08_10-12_57_30_jpg

Finally we go over everything again with fluidfilm.

The smile of someone earning cash-money.

The smile of someone earning cash-money.

D7000_2013_08_10-13_02_26_jpg D7000_2013_08_10-13_02_22_jpg D7000_2013_08_10-12_59_14_jpg

Skid plate in forground

Skid plate in forground


My Inept Rust Repair: It all started when I went to plug in the fuel level sender…

Note: These steps are embarrassing. This is not the right way to do this, this is what happens if someone believes advertisements for magic chemicals instead of just believing the professionals who say you need to replace with new metal. This does fix the main issue which is the puddle of water inside the car behind the wheelwell. I am intending to keep everything bombed with FluidFilm.

Yeah… so. Fuel gauge on dash not worky. Always shows E as in Empty. Previous owner says it’s just a matter of connecting the plug. There is in fact a plug inside the car above the driver’s side rear wheelwell – all virginal and ready to be Plug-Ed, and there’s a plug on the other side of the sheet metal right behind the driver’s rear wheel well. All that’s needed according to previous owner is to drill a hole for the wire to pass through.

Context From Inside the Vehicle: View from the inside looking forward at driver's side rear wheelwell. The rectangular hole on the left had mud and water in the bottom. The leaking seam is at the forward edge on the right side (can't see it in picture). The hole in the panel goes to a crossmember that bolts to the frame of the car. That sticky wet stuff is fluidfilm which never dries.

Context From Inside the Vehicle: View from the inside looking forward at driver’s side rear wheelwell. The rectangular hole on the left had mud and water in the bottom. The leaking seam is at the forward edge on the right side (can’t see it in picture). The hole in the panel goes to a crossmember that bolts to the frame of the car. That sticky wet stuff is fluidfilm which never dries.

Clean It Out

I put on those safety goggles and under the car. Clean it out rear well. Hmm. Where should the hole be? The fact that there’s no hole here is a mystery. I can conclude that this portion of the car was rebuilt outta metal, and the last part was to drill the hole. I dig around on the inside and outside.

Lo! There be-eth a small puddle of water and a layer of fine mud about a cm thick. This car has a leak from the wheel well! Scrub out all the mud. The metal below is thankfully mint but there is a small amount of rust and crappy metal in a very hard to reach inside seam up against the wheelwell. I poke and prod with a screwdriver and manage to push a hole through the wheelwell. Its more like a seam.

The exact location is pretty difficult to photograph, I can barely get my hand in there. But being a hole I need to take care of it. Also need to get all that rust out before repairing. First I get my metal bristled brushes and go to town on everything loose. The area is so difficult to reach that I need to bend loose metal in the wheelwell in order to get access to the hole between the inside and outside, and in order to properly scrub and scrap everything. Get lots of cuts in my hands through the gloves since lots of sharp jagged edges.

I’m a little aggrieved at this hole. Clear that it’d need welding to repair correctly but the area is so congested that one would need to cut everything out and rebuild. Expensive and doesn’t seem so necessary. I’m going to go with the chemical fix, seal metal as well as I can, then bomb it all with FluidFilm.

De-grease

Since I had previously bombed the area with fluid film I need to use degreaser. I had Marine Clean from the local Auto Paint Supply, which is pretty strong toxic degreaser, spray it on, let it sit, clean it off, repeat.

De-Rust

Painted phosphoric acid (naval jelly) inside and out. Make a big ol mess of it. Let it sit and corrode all the rust for an hour, then wash with water. Repeat until metal is rust free.

Install that dang cable:

Install fuel sender cable. This is probably a mistake but I stuck the fuel sender cable through while the seam was open. Verified Fuel Gauge Works! Yay!

Fold Metal Back Where it belongs:

Next step I fold the remaining metal back where it belongs. I’m left with largish holes where I tore out bad metal.

Por-15

Metal is nice and crusty so I skip the metal-etch, I degrease again, then painted silver POR15 onto everything inside and out.

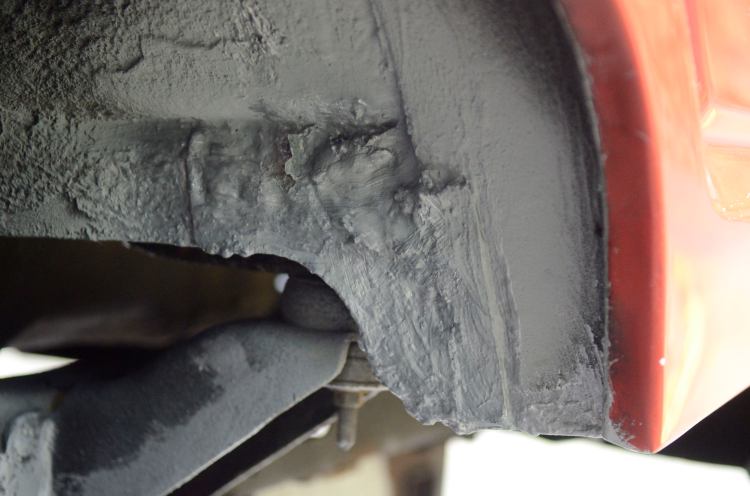
Close-up of the hole I made in my wheelwell. Fuel sender wire is visible through the hole. This big hole is not into the vehicle. There is a small hole into the vehicle if you reach through this hole and to the right.

Close-up of the hole I made in my wheelwell. Fuel sender wire is visible through the hole. This big hole is not into the vehicle. There is a small hole into the vehicle if you reach through this hole and to the right.

Context: wheel well repair in context, its right behind the driver's side rear wheel.

Context: wheel well repair in context, its right behind the driver’s side rear wheel.

The other side of the wheel-well hole. Can't see much. The little dab of silver is the bottom of the wheelwell panel with the hole seen in the other pictures.

The other side of the wheel-well hole. Can’t see much. The little dab of silver is the bottom of the wheelwell panel with the hole seen in the other pictures. Note that CROSSMEMBER coming from the right. The inside of that sucker is accessed from inside the car. Through the portal I can see that the other side of that bold is rusty. Not a huge amount but it does need treatment.

JB Weld and patch the Seam

Next, before POR15 has fully cured I patch the seam with a strip of cut metal and JB Weld. I cut out a strip of galvanized steel, bend to fit over the seam, then cover one side with JB Weld and press into place. I use a cut down piece of wood to block the metal into place until the JB Weld can cure. This is probably really stupid thing to do instead of welding. Since I can’t hardly reach the seam with my fingers there’s no way to weld it without disassembling everything. Area is free of rust so maybe it will last? Live and learn. Probably best would have been to media blast everything to kingdom-come and do the repair with bare metal. Oh well. Live and learn. I can rebuild the entire wheelwell in the future.

POR15 over the JB Welded seam:

Coat of por15 over the jb welded seam. Little can goes a long way!

Epoxy Putty:

Cover seam on side and out with epoxy putty. Small tube of Quik-Steel. Knead in hands for a minute or so, then lay down epoxy putty. I jam it up against the far side of the seam from the outside, then cover the seam from the inside.

Soft putty in place to cover large hole in wheelwell. This is just to keep water in the wheelwell. There's more goodness along the seam that you can't see.

Soft putty in place to cover large hole in wheelwell. This is just to keep water in the wheelwell. There’s more goodness along the seam that you can’t see.

POR15 the epoxy putty.

Putty will absorb water so figure I should seal it with POR15. Bombs away.

Rustoleum Zinc Spray Paint:

Bomb everything with rustoleum zinc spray paint. This is a zinc primer.

Rustoleum Zinc Spray Primer over everything.

Rustoleum Zinc Spray Primer over everything.

Wow, it sure looks worse in pictures than it does in real life. Well – at least the water isn’t getting into the car now. I really think next step I take a grinder and sand it all down so its smooth, then metal edge, recoat with por15, reprime.

Wow what a shit job I’ve done! Someone someday is going to curse me for it. I guess i wait and see if anything cracks loose.