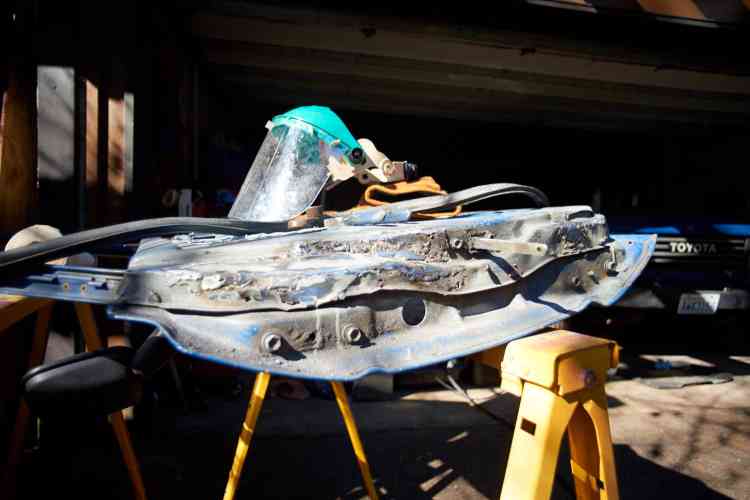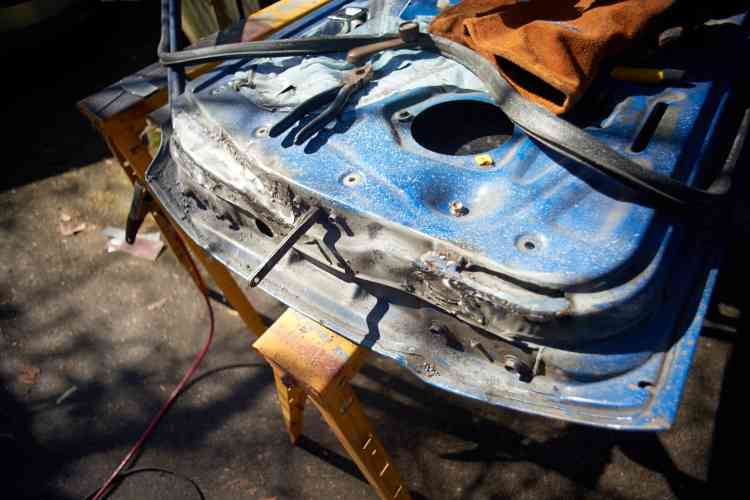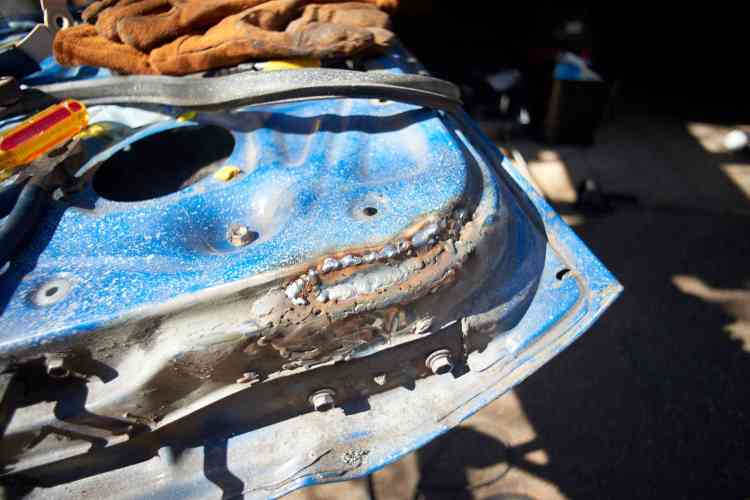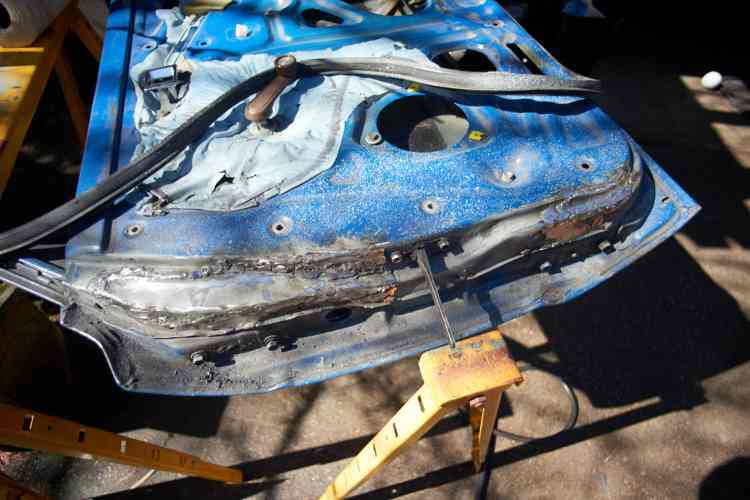
Door A Explodah

Mar 15 201911-57 AM - Copy

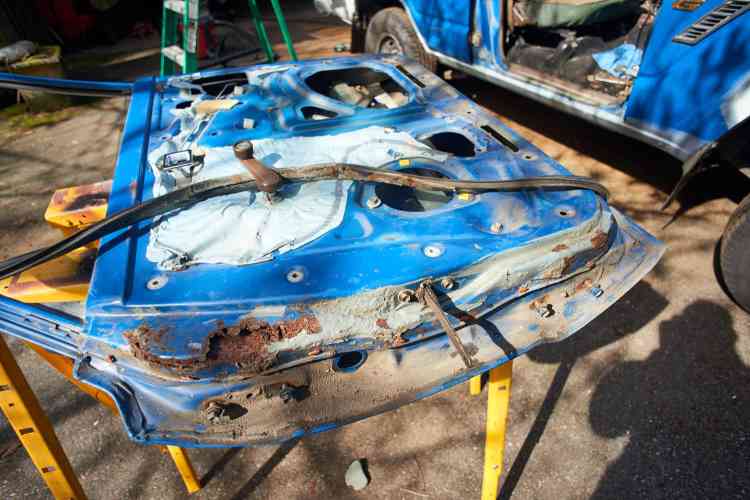
I dunno why, I glanced at the hinge area of the door. There was some flaky loose bubbly paint there… Gee. Picked at it with my finger and the paint came away pretty easily – in big chunks? Got a screwdriver and scratched it a bit… and it went through the metal. Made a sort of sickly scrunch sound. Like putting a screwdriver into some gravel? Awww… I’ll take the door off and have a look?

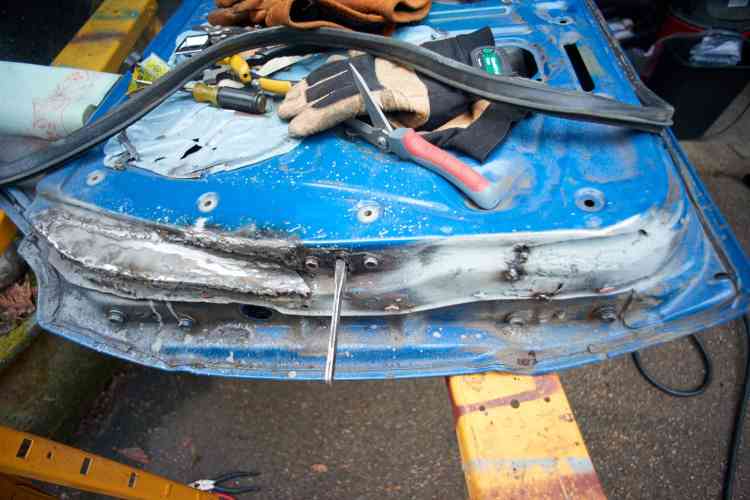
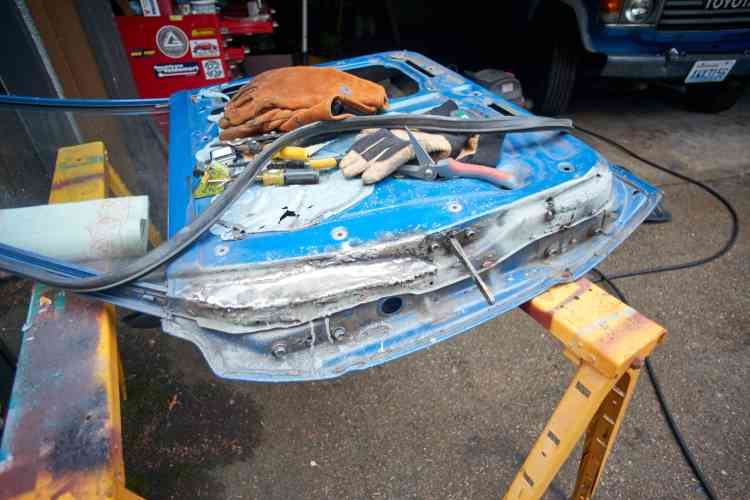
Door off, onto sawhorses in the driveway. Scratch a bit more with screwdriver… oh man. I’m going to be sick. Paper bag time. Breathe… gee. I’m going to need a new door. Wondering if I can find a matching color I find some used for $100-$150 but then the shipping is $250+. $400 for a new door? Hmm. For $400, at my beginner welder hourly rate of $0.25/hour, that’s 1600 hours of welding. I could probably build a whole new truck out of mig blobs in 1600 hours. I put the door back in the truck. I gotta think about this…

Next day I have another look. Gee. This doesn’t look SO bad. Its just metal. I can grind the bad stuff away and replace. Pretty clear though that the POR-15 from previous owner did nothing but hide the problem for a few years… can’t hide from the screwdriver of truth though…
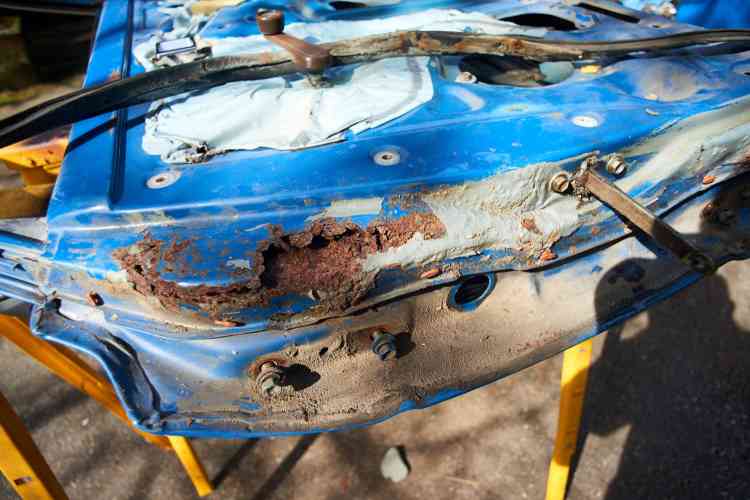
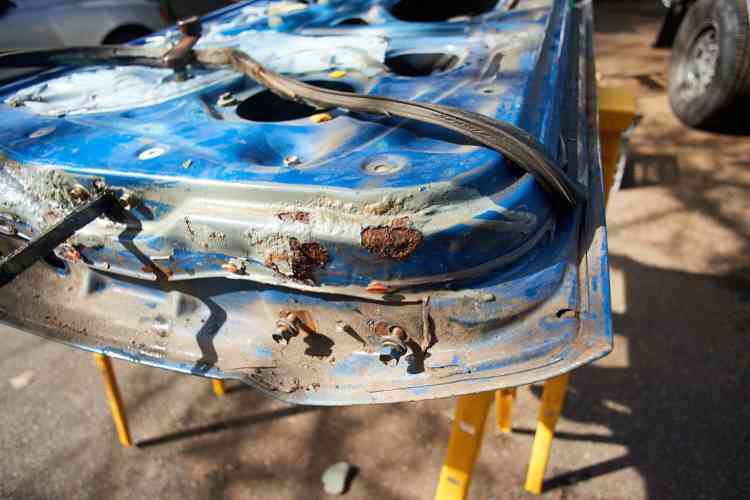
Mar 15 201911-57 AM_1 - CopyMar 15 201911-58 AM

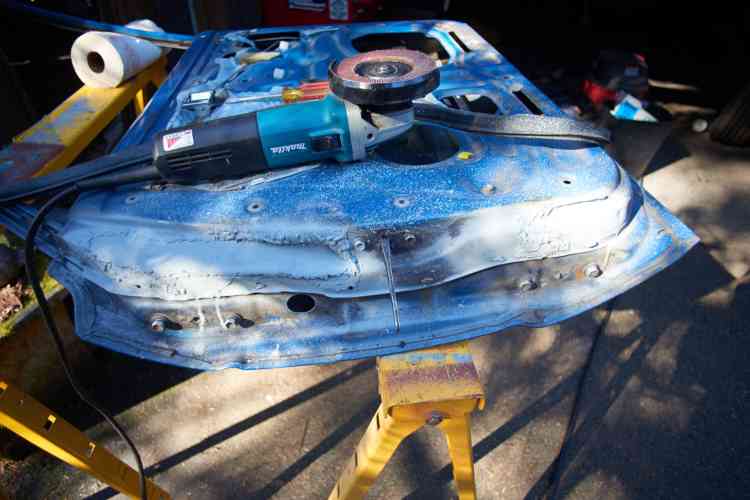
I take the door back off, get out the grinder. And the mask. And the face shield. Pretty much complete welding attire to protect from the brown cloud that’s about the envelope the area.
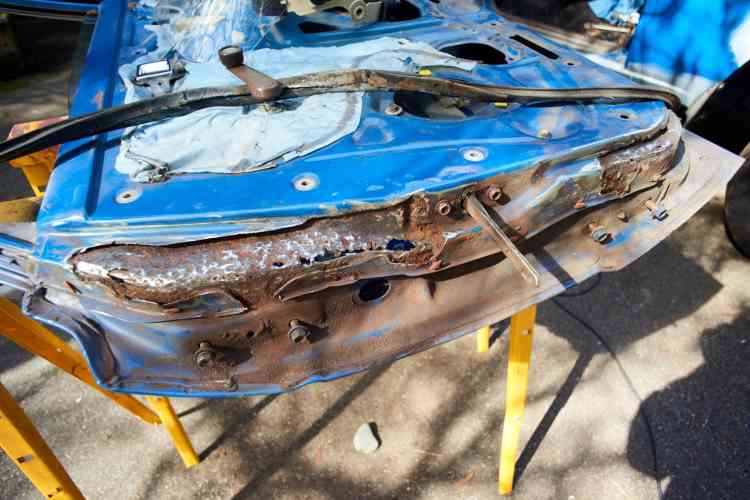
Mar 15 201912-28 PM

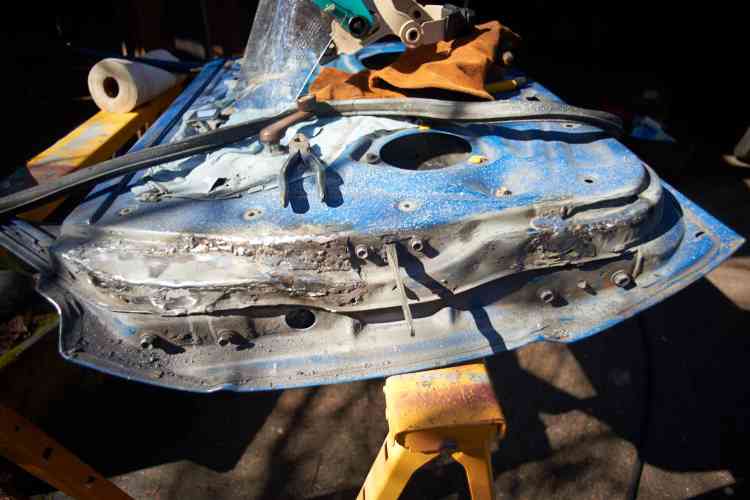
Most of the outer skin is just gone after grinding. Some of the second layer is gone too. But there’s a ton of good metal around. This is no big deal? I’m generous with the grinder to get to nice thick metal. I am a bit concerned that what I rebuild needs to fit like the old door. The area I need to be most careful about is where the rubber seal hangs on the door. Need to follow the original lines. Otherwise the door won’t door.

Tin snips and jigsaw, I cut out metal, hammer and bend, freehand repair pieces, then glue them into place with my mig.
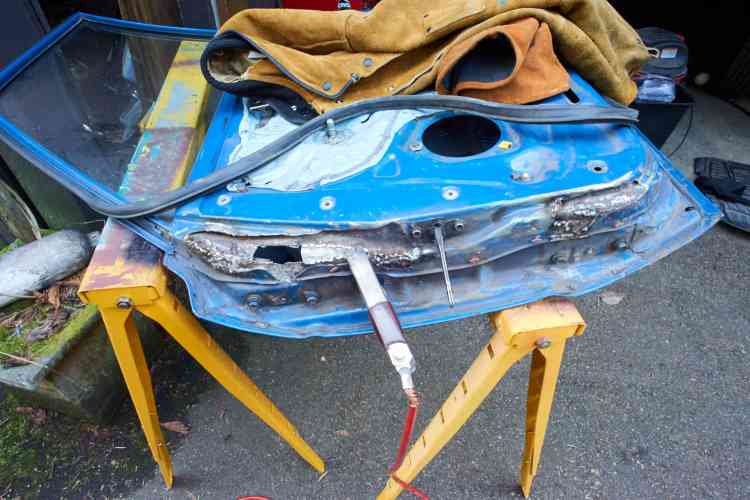
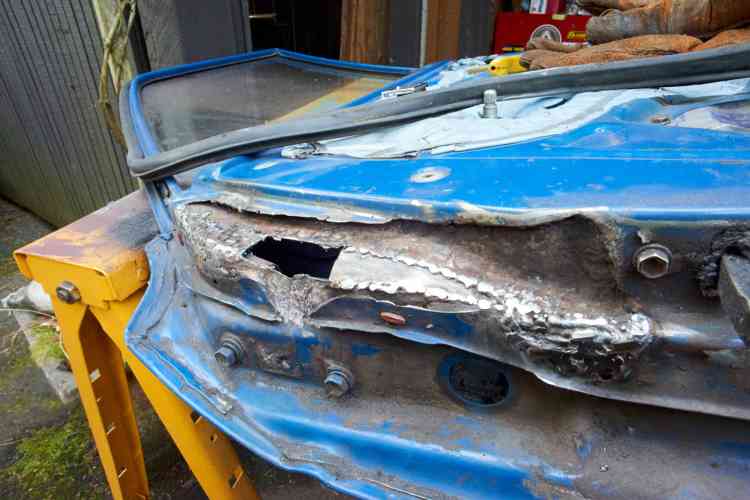
Mar 16 20193-04 PMMar 16 20193-20 PM

Having nobody to show me how this is done I get to experiment with a bunch of different techniques. The metal is nice and thick and the rust is gone I have no trouble with burn through. Lovely to have a big chunk of metal as a heat sink. The inner layer is soon filled. The other trick is lots of small blobs of metal. Zap-zap-zap. Pointillist style. Like Seurat? Gotta be careful though because its easy to have holes between the points. So sometimes after I’ve got the surface where I want it I’ll draw a bead across, melt it all a bit, then grind it back with grinder.

After I’m satisfied with inner layer I spray it all with zinc primer, then start on the outer layer. I’ve got 16g metal so that’s what I use. Even though the door is thick metal, the 16g is much thicker. I cut pieces to rougly the right shape, then grind down until they fit like my eye says they should. Weld one edge into place, then hammer the piece until another edge is in place. Eventually the piece is welded flush. Pretty neat!
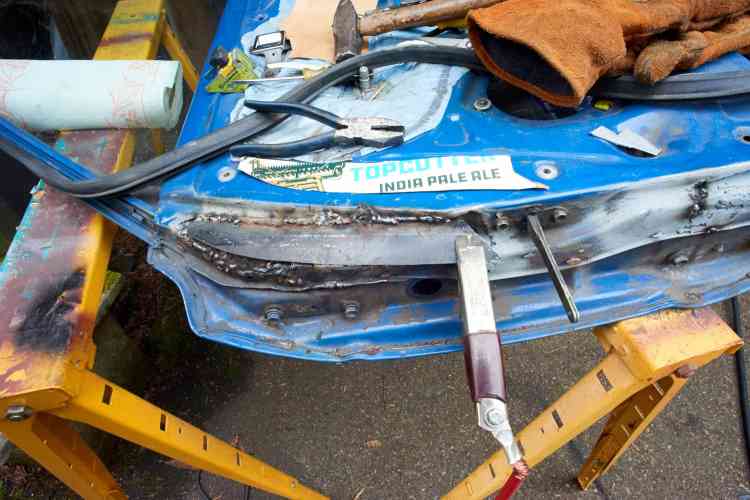
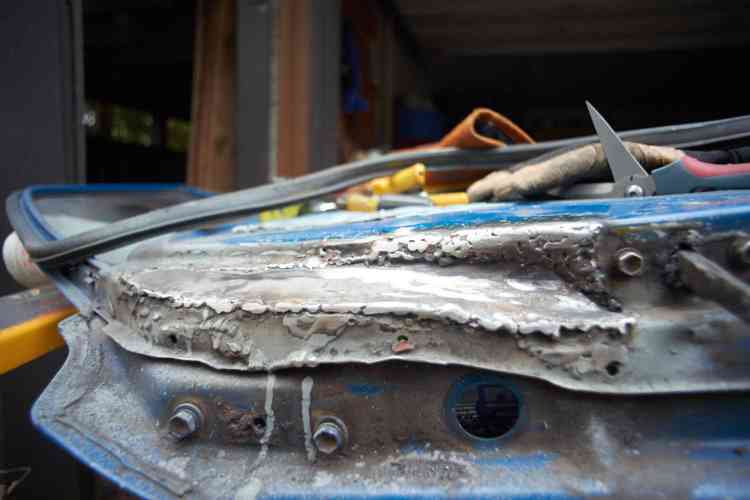
Mar 16 20194-56 PMMar 16 20195-59 PMMar 16 20195-59 PM_1Mar 16 20196-00 PM

End of the day I hose it all down with zinc primer. Tomorrow I’ll be done!
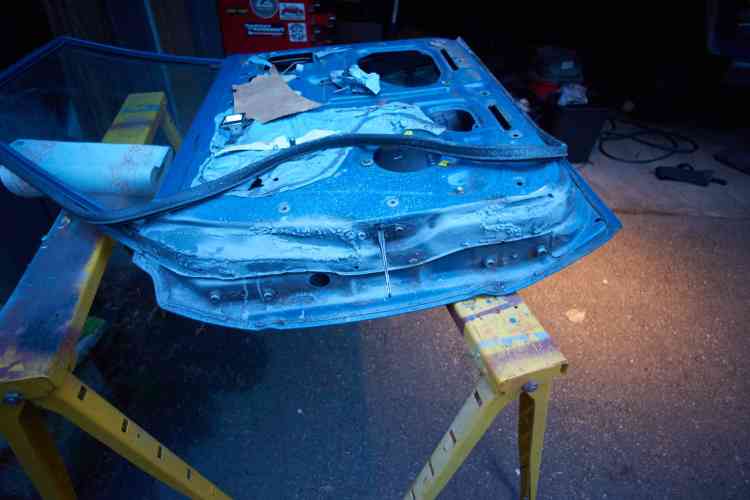
Mar 16 20196-19 PMMar 17 20199-41 AMMar 17 201910-47 AMMar 17 201910-47 AM_1Mar 17 201910-48 AMMar 17 201911-20 AMMar 17 201911-31 AM

This was a pretty interesting process, build up with mig, then grind down. In one section I had too many pin holes, I needed more heat. So finally I cranked slowly across the whole area real slow, drew a huge fat bead. That did the trick.

What this process taught me is that no matter what, I can just grind all this muck away in the future and do it again. If there’s corrosion, if it starts to come apart, etc, if it looks at me funny… I can grind it away and do it again. I’m empowered!
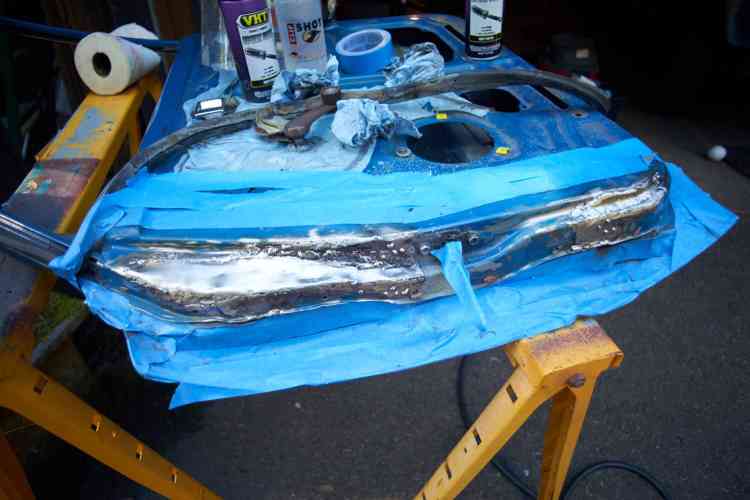
Mar 17 201912-50 PM

Last little bit went real slow. I used a bright light to see any pits or holes, fill them with weld blob, then grind down. Weld it all, grind it all, find more pits, repeat. But finally it was good enough. Hosed it all down with vht suspension paint:
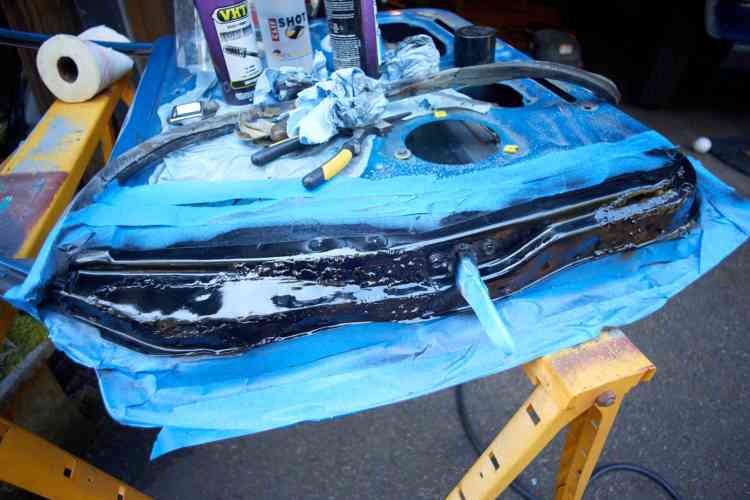
Mar 17 201912-56 PM

This maybe took me 10 hours of work? I reinstalled the door. It is lovely to see, smooth to the touch. The black paint isn’t really notable.

Most frustrating thing though… this is the best most complex work I’ve done and its pretty much invisible to anyone. I gotta open the door and point them into the hinge area and even then it isn’t really clear how much new metal is there.

Anyway. Now the driver’s door is looking at me funny. Looks like a lesser version of the same issue. Wonder how much easier it will go with my new skillz?
Bubbling Paint on the A Pillar (and other assorted rust bubbles)

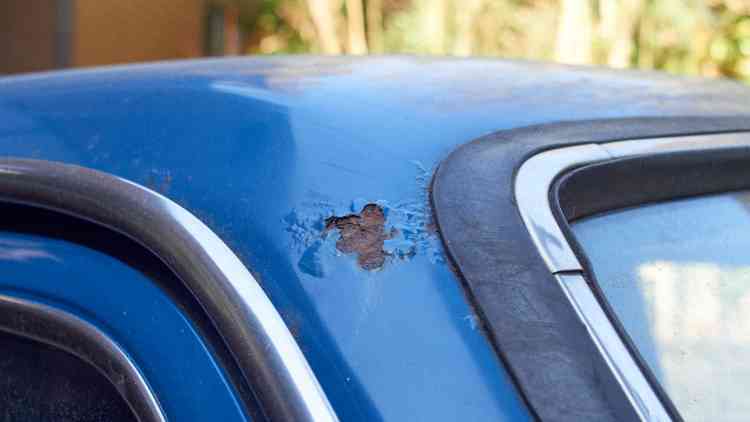
For a while I’ve been casting sidelong glances at the top of my a pillar. Paint there is sort of bubbling. A bit.

Try not to think about it because its so horrible. What if whole a-pillar is just a giant bar of rust? Is that a fatal problem?

Today I got out the step ladder and went at that rust bubble with a screwdriver.

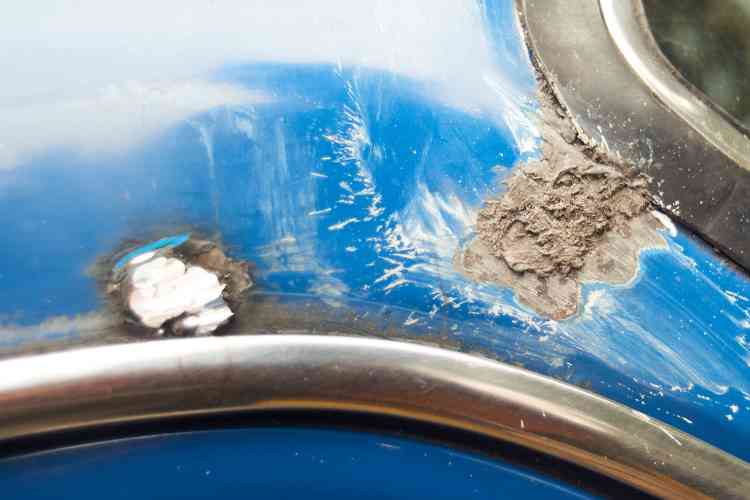
I didn’t take a picture before I started but it was just blue paint that had bubbled a bit. But it was also a bit soft to the fingers. So it was paint over something that wasn’t solid.

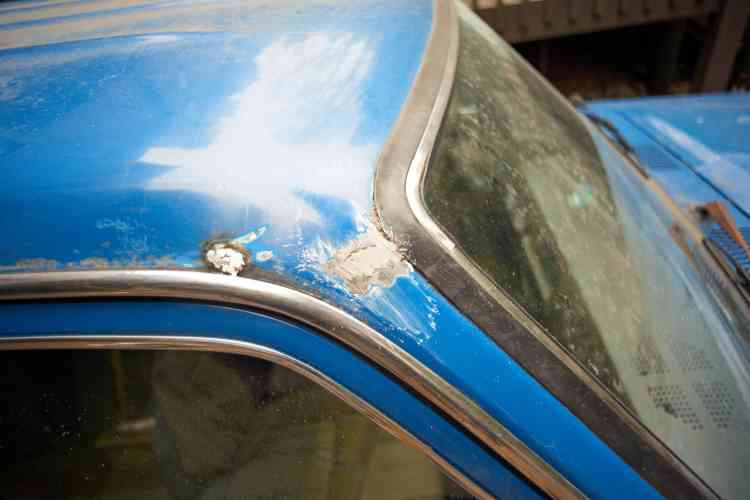
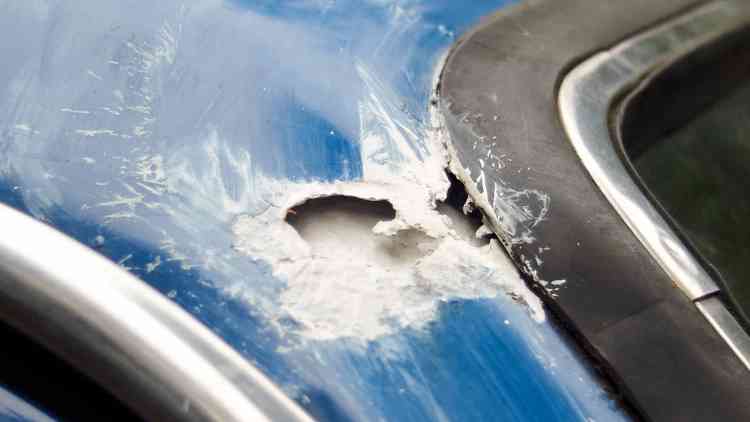
I scratched the paint off with a flathead screwdriver, then kept scratching at all the softness, the bubbling brown rust, until I’d explored the limits of the badness.

Unfortunately the rust extended to under the windshield seal, which means I can’t fix it with the mig unless I remove the windshield.

Here is right after I started to scratch:

Mar 09 201912-26 PM_5

After I’d scratched and ground it clean, then painted with ZeroRust.

Mar 11 201912-09 PM

I drove the car to my local awsome glass shop. They said… um… this isn’t exactly a… ‘rotisserie restoration’… the windshield will probably break if we remove it… prolly you should put in a temp fix and do the welding when the windshield needs replacement.

Just as I got home my wife got home from her moms, she handed me a half used pack of JBWeld Steel Stick. Age Unknown…

So I tore off a chunk, worked it for a minute and then jammed it in the rust hole, pressed it way up into the hole using a screwdriver. Kept pushing until it was jammed hard with whatever epoxy that is. My goal was to press out any voids.

When I was done it looked like an old hornets nest.

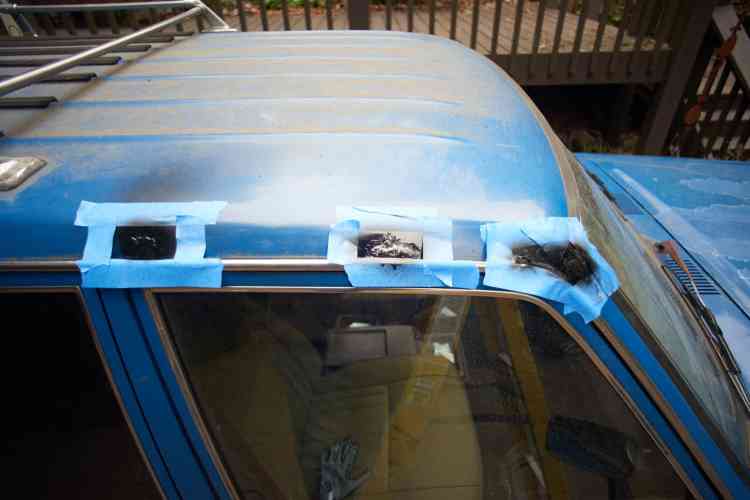
Then nearby were some other small bubbles in the paint… sure enough these were hidden rust holes. I gave it the same treatment except I could grind all the metal clean with my angle grinder, cleaned the underneath as well as I could, then hosed it down with some coats of zinc paint. And then I repeated that work on 2 other rust holes.

After a few hours the zinc was dry enough to weld. Because there was no seal nearby I filled the holes with zaps from the mig welder. Then grind the welds down. Pretty nice.

The main thing is to give it two small zaps, then wait until the metal is warm to the touch. Generally a minute between zaps. This keeps the heat way down, avoids warping the metal or catching the car on fyre.

Mar 11 20193-28 PM

Just starting to weld up a larger hole. Lots of time to take pictures while waiting for the metal to cool…

Mar 11 20193-28 PM_1

Right before I close up the welds with the final blobs I give the hole a generous blast of zinc paint. Maybe help to seal up the backside of the new metal.

Mar 11 20194-13 PM

Finally grind the welds down most of the way, then paint with VHT Epoxy Suspension Paint. To cover the welds I used 4 very light coats with 10 minutes between. The jbweld was thirsty though, it took 3 heavy coats, just kept sucking up the paint, which I think is fine.

Mar 11 20194-23 PM

Started raining last night.

I am wondering how to help reseal that windshield rubber until that distant day when the windshield comes out. Supposed to use urethane glue to hold rubber onto the metal and glass…

New Exhaust at A1 Muffler Service

Appointment with Wayne at “A1 Muffler Service” for next Wednesday at 8:30am, I leave seattle at 7:30 and arrive at 8:05. Spend a few minutes driving around this area of Everett. Lots of used truck lots, used rv lots, used camper lid lots, used 4×4 lots all along hwy 99. This is the car repair part of town, but wow there’s a lot of recreational vehicle businesses. Does that say something about Everett? Maybe tere is a whole nother section dedicated to boats?

Wayne arrives at 8:40, moves the vehicles and has me drive it onto the lift. I wait in the office which is a genuine old-style car repair office. Timeless look from out of the early 60s I estimate.

Vintage Office in A1 Muffler Service

Vintage Office in A1 Muffler Service

The Muffler Minute-Men

The Muffler Minute-Men

Vintage Office in A1 Muffler Service

Vintage Office in A1 Muffler Service

Vintage Office in A1 Muffler Service

Vintage Office in A1 Muffler Service

Vintage Office in A1 Muffler Service

Vintage Office in A1 Muffler Service

Vintage Office in A1 Muffler Service

Vintage Office in A1 Muffler Service

Bullitin Board with Muffler Humor (and news).

Bullitin Board with Muffler Humor (and news).

Lots of “muffler industry advertising paraphernalia.” An plastic clock painted and textured like wood that reads: “We’re AP muffler Minutemen – we install mufflers in 30 minutes or less TRY US!” with of course a revolutionary war minuteman with tricone hat and rifle in hand. So… who wants their muffler installed in a short amount of time? I’d rather wait and get it done well.

I examine the other cars in the garage. An 80s firebird has several rusted holes in its exhaust and exhaust is suspended from car with 6 feet of wire. Nice looking 280z.

D7000_2014_02_12-10_08_38_01 D7000_2014_02_12-10_08_38 D7000_2014_02_12-10_08_36_01 D7000_2014_02_12-10_08_36 D7000_2014_02_12-10_08_35 D7000_2014_02_12-10_08_27 D7000_2014_02_12-10_08_23 D7000_2014_02_12-10_08_02

I mosey back into the office to sit on the big couch and wait as customers come in. Each and every one has a bitchy whiny tone with Wayne. “My alternator doesn’t work – I got a new battery but the battery light is still on”, “my brakes broke again”, etc. I speak to a fellow customer on the couch who complains that there used to be two couches. I ask about Wayne: “He’s the best mechanic there is”. Funny relationship these folk have with their mechanic. Each wants wayne to look at their issue right away, wayne politely demurs and continues the exhaust work. They grumble but tolerate it.

Some guys come in and seem really pushy, talk to fast and pretty much demand that he do something for them. Wonder what this relationship is? Does he realize that so much hinges on his ability? From 15 minutes watching and from the number of waiting people I think Wayne could raise his prices, be less busy and do better for himself.

Exhaust is finished in just over 3 hours. $200 seems a great value. I drive off into the sunset and a happy future?

D7000_2014_02_12-10_09_16 D7000_2014_02_12-10_09_15 D7000_2014_02_12-10_08_42_01 D7000_2014_02_12-10_08_42 D7000_2014_02_12-10_08_39

New exhaust: the next day (well, that afternoon):

On driving back to seattle I notice truck has a nasty vibration throughout. Pretty harsh, loud and unpleasant sound. Dang. I’m sad. What is that? I realize… remember the snow? Shit. I bet I left the front hubs locked. Pull over at a rest area and sure enough they’re still locked. They are warm and so is the front diff. Huh.

Starting the car that evening to drive home from work the truck makes a loud clang clang clang!! Sound coming from the front engine area.  The exhaust is coming into contact with the engine on startup. I put my head under and check out the exhaust. There is no flex tube at all. That is gross negligence, a diesel moves a bunch, the exhaust will be destroyed in a short while. Flex tube is not an option, it’s a requirement on this truck. Probably that is the source of the driveline vibration. I guess I’ll be driving up the next day.

The next morning I arrive back at A1 bright and early, 8:30am. Wait for wayne to show and am joined by an FJ40 from TorFab that is waiting for exhaust to be installed, then Tor arrives too. They check out the exhaust that was installed yesterday, it is not following the desired factory routing, looks more like the routing used for a 60 v8 conversion. Tor says flex tube is necessary, not optional. Explains how exhaust is supposed to be routed through the leaf springs. Wayne arrives and I explain the issue with noise and clanging, the need for flex tube. He has no flex tube. What about the one from my old exhaust? Its gone, he leaves the old stuff outside at night and its taken away by the vultures. Bummer. Wayne orders a flex tube and I’m to return in 2 hours. Shit. That’s what I get for doing no research and trusting someone to do it right. I guess I should have asked Tor to take it to A1, he’d be able to explain what was needed. Anyway, internet research shows what the OEM routing was, also the routing that wayne used. Seems that both are fine though the Wayne routing says a flex-tube downpipe is necessary to prevent exhaust from tearing itself apart. We’ll see I guess.

Black flame proof paint seems to holding up just fine.

Black flame proof paint seems to holding up just fine.

Exhaust now exits at stock location, drivers side rear. I sort of miss the passenger side side pipe. :(

Exhaust now exits at stock location, drivers side rear. I sort of miss the passenger side side pipe. 😦

Once exhaust is home I have at it its shiney newness with some VHT Flameproof paint. I apply per instructions with light coats every 10 minutes until the can runs out. Then I need to cure the paint by driving it so that the exhaust gets progressively hotter before cooling. Being a diesel it probably never gets hot enough but I follow the instructions anyway.

A month has passed and the stuff seems to be stuck on well. Looks good, flat black. Can’t scratch it with fingernail so I guess its permanent.

Uh Oh – Broken Rear Shock Mount

Friday night, driving in the parking lot of an office park. Have them little speed bumps? Like 3” high and 3” wide. Going 15mph, bam-bam… next set: bam-bam… then again: bam-bam-grrrrr-rrrrr. Huh?

First thought, ah jeese, I’ve broken my exhaust pipe again. My previous repair was a sheet of stainless wrapped around the cracked and rotted exhaust pipe. Kinda sketchy. It is dark, I stop and check out underneath with a headlamp.

Drivers side.

Drivers side.

Uh-oh. There is a tube that connects the two frame rails, it goes between the rails right above the rear axle. The rear shocks connect to it… and one side has broken loose. Jeese. That’s not the sort of thing that I consider normal maintenance. I’m a little surprised because the rest of the frame looked so good but that tube always did have a sketchy look about it, looked like it had been rusted before, then treated.

Removing shocks so I can pull the shock tube loose.

Removing shocks so I can pull the shock tube loose.

Removing shocks

Removing shocks

Measuring distance so I have info for folks I call. Also to see what average shock length is in the rear.

Measuring distance so I have info for folks I call. Also to see what average shock length is in the rear.

Shock tube removed, with shocks.

Shock tube removed, with shocks.

D7000_2014_01_26-16_04_43 D7000_2014_01_26-16_05_11 D7000_2014_01_26-16_40_44 D7000_2014_01_26-16_40_50 D7000_2014_01_26-16_40_57 D7000_2014_01_26-16_42_02

Can see the passenger side rear brake line passes very close to the shock tube. Could have been torn.

Can see the passenger side rear brake line passes very close to the shock tube. Could have been torn.

Another view of rear brake line.

Another view of rear brake line.

D7000_2014_01_25-11_07_14

Ok, well the good news is that it is just shocks, you don’t need them to drive. Broken springs would be another story. There is one part I don’t like, what is holding the frame of the truck together in the back? The body is bolted to it, probably strong but twisting might knock something else loose. I determine to drive safely home and leave it in the driveway until a repair can be devised.

Solicit advice from internet. Consensus: this is a common failure for old 60s because that area tends to rust. Also that the repair is the epitome of simplicity, just fab and weld in a new tube. Funny thing, doesn’t look like there is a lot of rust there but the tubing is very thin. I’m going to guess the failure is due to fatigue.

Anyway, I call around, I used to know folks that could make stuff like this, and they’ve all become old and highly paid so not interested in this type of work. I guess this is an excuse to give some business to TorFab up in Mukilteo. Of course taking the truck in may be an excuse for a bunch of while you’re in there.

This weekend I crawled under the truck, detached the stocks from the axle and then pulled the tube out. Very small amount of force needed to pull the cracked end clear from the frame.

Honestly the ride is much softer though it is clearly not well damped. Not the sort of ride I’d want for an autocross. Fun accelerating out of corners, it squats like a baja super truck.

I call Tor of TorFab up in Mukilteo. He says this is common, they’ve repaired it before. Probably cost between $500 and $600. Sheesh, that’s not so cheap. I figure I can find someone to do it cheaper. I take it by Ishii Motor Industries but they estimated $750. So it goes, I make an appointment with Torfab.

Repaired Tube. I hit it with Rustoleum to protect the por15 from any stray uv.

Repaired Tube. I hit it with Rustoleum to protect the por15 from any stray uv.

One concern, the remains of the shock mount pass through the frame. Perfect place for water and rust.

One concern, the remains of the shock mount pass through the frame. Perfect place for water and rust.

After a short drive in the rain the old tube is full of water.

After a short drive in the rain the old tube is full of water.

New repaired shock tube.

New repaired shock tube.

Before bringing it in a spend a few hours under the truck cleaning up the ragged pipes with an angle grinder. Boy the exhaust is sure rusted. I banged on it a few places and ended up with a big pile of rust on the floor, sucker is shedding its surface, looks like its really thin now. Dang, need to be replaced.

Picked up truck and Tor did a reasonable job. New pipe and welded plates are secure, all well painted with Por15, which is pretty expensive stuff. The shock pins are aligned well and the shocks went right on with a little grease on the pins, no issues so problem really is solved. I did see that the original pipe through the frame was intact and the inside of the pipe was not sealed where it met the plate. Once home I wire brushed that area clean, painted with several coats of vht suspension epoxy, then several coats of rustoleum cold galvanized zinc. I also hosed down all the new Por15’d metal with rustoleum. Still, that open tube through the frame is right next to the rear tires, it’ll fill up with water and road grit once it rains. Need a way to keep water out of there.

I take a quick drive after getting the shocks reinstalled and lubing all the grease nipples: wow, here I thought I was due for some new shocks, after driving without any shocks for 2 weeks I really appreciate the ones I have. I’ll be deferring the purchase of new shocks until there is a demonstrable need.

One short sighted thing: I should have had tor weld sway bar mounts onto the shock tube, now installing sway bars onto the rear will be a big production.

When picking up the car Tor noted that my exhaust was both on its last legs and rubbing against the read rubber brake line, melting it. The brake line needs to be replaced. But.. also.. the exhaust is not routed correctly, needs to run down the other side of the car. Previous owner routed the exhaust straight down from the engine and along the driveline. This means it sits too close to the transfer case which will cook the seals. Uh… shoot. How much is that? Tor says: oh, just go to “A1 Muffler Service”, just up the road, Wayne knows how it should be plumbed and he’ll do a good job for not much money. Cool!

I stop by A1 on the way home, meet wayne. He estimates $200 for new exhaust routed correctly. Sweet! In the 5 minutes I’m waiting to talk to him he is handing out some completed welding to a customer (some sort of flange), on his back cutting a muffler loose from a a car, giving keys to another customer. We wears a black ski jacket that has been absolutely thrashed on the back, strips of polyester and insulation hang loose from the back. His face is burned and heavily creased from all the welding. I determine that in all of north America this is one of the proud few that actually work for a living.

Front Sway Bar installed – Survey Says?!

Survey says: “Awesome.” Survey says: “don’t drive your lifted 60 on the road without one.”

True, I’ve no honest notion of the state of my shocks, my springs or my steering joints, but installing the front sway bar has made an enormous difference in my truck’s handling.

Used to be the truck felt like the front wheels were tucking under the front of the car. The truck would dive and lean to the outside of every corner and that feeling limited my speed. Truck didn’t feel like it would tip but I was definitely losing grip from the lean.

Now the truck is tastefully flat in the corners, the truck handling really is transformed. Amazing. Amazing.

To any doubters I say: try this! $60 for extended links, $6 for bottle of epoxy spray, its a huge value. I’d have paid $1000 to have the handling this much better.

Installation Process:

Hardened Steel Tap for Chasing Threads

Hardened Steel Tap for Chasing Threads

First thing the brackets bolt onto the frame, there are holes waiting with threads. The previous owner had coated the frame with some rust preventative coating so bolts wont’ go in, first every threaded hole must be chased with a tap. If you don’t know, a tap is a special hardened steel screw that cuts threads into metal. But running the tap through the threads I clean them out so bolt will not be damaged.

Tap with Tiny Wrench. Gently spin tap in and out to clean out the existing threads. Idea is to clean, cut as little as possible. Avoid cross threading!

Tap with Tiny Wrench. Gently spin tap in and out to clean out the existing threads. Idea is to clean, cut as little as possible. Avoid cross threading!

Holes tape about 5 minutes each to tap. After chasing the threads my precious new Toyota bolts thread cleanly.

Tapping frame on passenger side.

Tapping frame on passenger side.

D7000_2013_08_21-17_34_53

Bolt bracket into place.

Sway bar bracket bolted into place on passenger side.

Sway bar bracket bolted into place on passenger side.

D7000_2013_08_21-17_46_37

I pre-installed the Man-A-Fre extended sway bar links to sway bar. This was a mistake:

1) No way to thread the sway bar into place with the linkages in place.

2) I installed the linkages the wrong way.

Stock BJ60 Sway Bar with Man-A-Fre extended sway bar links installed pointing the wrong way!

Stock BJ60 Sway Bar with Man-A-Fre extended sway bar links installed pointing the wrong way!

Don’t be stupid like me – the front diff hump is on the passenger side.

Next steps were very simple. These steps should be done for each side before moving to next step:

  • Chase threads where brackets bolt to axle housting (there are only 2 of these)
  • Thread the sway bar through springs so it lies in front of bracket mounts.
  • Apply grease all over the rubber bushing, wrap it around the sway bar and insert it into metal bracket.
  • Insert bracket tab into axle housing.
  • Bolt other side of bracket into axle housing.

Now you have a sway bar that can be rotated on the axle housing. Next:

  • install linkage between frame bracket and sway bar end. You’ll need two wrenches for this.

Now take a victory lap and enjoy the new responsiveness and non-scary turning.

Back home and hose it all down with Fluidfilm. You’ll not be touching it for a while except maybe to check that bolts are still torqued tight.

Sway Bars installed, looking back at passenger side.

Sway Bars installed, looking back at passenger side.


Frame, frame bracket, man-a-fre linkage an sway bar on passenger side.

Frame, frame bracket, man-a-fre linkage an sway bar on passenger side.

D7000_2013_08_23-11_57_12

D7000_2013_08_23-11_57_35 D7000_2013_08_23-11_58_01 D7000_2013_08_23-11_58_19

Drivers side bracket.

Drivers side bracket.


Front Sway Bar – A Nasty Rusty Caterpiller into a Epoxy Coated Butterfly!!!

Stock link next to man-a-fre 2.5" extended link.

Stock link next to man-a-fre 2.5″ extended link.

My cruiser came with a front sway bar. Well, it was on the burnt hulk that I was able to pick parts off, I got it myself and it came home with me in the back with all the other old rusty parts.

A few weeks ago, after finally installing the transfer case shield, I went to mount it up and found that the links between the frame and the bar were too short. I sort of expected this since the rig is lifted 2.5″ compared to stock.

I can’t install the sway bars because the link between the bar and the frame are too short. I need longer ones. I did a little research and found a recommended place that makes “heavy duty” ones. Man-A-Fre. The alternative is to buy a long bolt and sleeve, make my own as the link itself is very simple:


Stock sway bar link disassembled. Simple.

Stock sway bar link disassembled. Simple.

Order off the internet and they arrive 3 days later. They were $18 each, postage was $17. Dang. They are quite nice though.

Sway bar with stock link installed next to pair of man-a-fre 2.5" extended links.

Sway bar with stock link installed next to pair of man-a-fre 2.5″ extended links.

Purpose of Sway Bar:

Front sway bar attaches to the car at four points:

1) Left outside of differential near the leftwheel.

2) To the left frame just above and forward of where it attaches to (1).

3) To the right frame just above and forward of (4)

4) Right outside of differential near to right wheel.

The important part of this is that the differential (the wheels) and the frame, are connected by… the springs! The wheels are unsprung, the frame is sprung. The wheels move up and down relative to the frame of the car. The sway bar gets in the way of that motion.

Sway bar is very simple. The way the bar is connected to the frame allows it to rotate. That means that if I drive straight over a speed bump the sway bar will rotate and have no effect on the motion of the differential and the wheels. However, if I drive over a speed bump at an angle, say left wheel onto the speed bump before the right wheel, that will cause the sway bar to resist the upward motion of the left wheel. The sway bar acts as a “torsion spring” a twisty spring.

So I’ve just described something the sway bar does, but why is that good? Actually, the case I describe above is not good. You don’t want to limit independent wheel movement in rough terrain. That’s why many off roaders detach their sway bars. But there is a pretty common case where sway bars are good:

Its called “going round corners”. When you go around a left hand corner the car body sways and places more force on the outside wheels. That force depresses the springs on the right side, which causes the vehicle to sway more, etc. This sway is disconcerting and bad for handling. When cornering its best to keep the vehicle flat at it keeps more weight on the underweighted inside tires. This problem is more severe if you carry lots of stuff on the roof.

So, I’m hurting the offroad ability of my vehicle in order to improve the on road handling.

Stock link

Stock link

Stock link and bracket that attaches to frame.

Stock link and bracket that attaches to frame.

Comparison of stock link and Man-A-Fre Heavy Duty 2.5" extension link.

Comparison of stock link and Man-A-Fre Heavy Duty 2.5″ extension link.

My nasty sway bar with link removed.

My nasty sway bar with link removed.

Stock brackets and links.

Stock brackets and links.

New Links Arrived!

This morning my new fancy expensive Man-A-Fre heavy duty sway bar links arrived. Nice! Very pretty. I hold them up against my sway bars and realize they are really nasty, all rusty, and need to be cleaned up before installation.

Sway bar and rotating attachment that bolts to differential housing.

Sway bar and rotating attachment that bolts to differential housing.

Link and bracket and sway bar.

Link and bracket and sway bar.

Call my friend whose place of work has a wonderful machine called a “media blaster” and he lets me use it. This is a wonderful box, you put dirty stuff in it, put your hands into rubber gloves bolted through the walls of the machine, head up to the glass. Pick up the gun, press the pedal on the floor and high pressure air and sand comes blasting out. This wears though grime, grease, rust, and leaves the metal shiny and virginal, a perfect prep for paint. I wrap it in plastic to keep it clean of oil from my hands.

After 60-70 minutes I have the pieces cleaned off pretty well. Good enough. Coming home I pick up a can of VHT Epoxy Suspension Paint which I used previously on the Porsche sway bars. Excellent stuff.

Wow

Home with a bag of clean metal.

Home with a bag of clean metal.

Really is amazing. The blaster works so well, its hard to believe the same pieces went into the enclosure. I’m a huge fan.

Ready for paint

Ready for paint

Propped up and ready for paint.

Propped up and ready for paint.

D7000_2013_08_16-16_17_32_jpg

Cleaned brackets!

Cleaned brackets!

D7000_2013_08_16-16_14_08_jpg

Cleaned Swaybar End

Cleaned Swaybar End

Cleaned bits.

Cleaned bits.

D7000_2013_08_16-16_16_49_jpg

Silver sway bar

Silver sway bar

Lay everything out on the driveway and hose it down with VHT. This is terrific stuff. $7 a can, easy to apply and super durable. It doesn’t tolerate UV light, but sway bars are hidden pretty well from the sun so should be ok?D7000_2013_08_16-16_31_27_jpg D7000_2013_08_16-16_31_21_jpg D7000_2013_08_16-16_30_38_jpg D7000_2013_08_16-16_30_27_jpg D7000_2013_08_16-16_25_10_01_jpg D7000_2013_08_16-16_24_14_jpg D7000_2013_08_16-16_23_04_jpg D7000_2013_08_16-16_22_20_jpg

The VHT must all be applied in 3 coats over 1 hour. After an hour you leave it. Can be handled in 3 hours, fully cures in 7 days, so I can install it next week. Cool!

One might wonder why I use this instead of POR15? Por15 is quite brittle feeling, its harder to the touch and I don’t think it will handle abuse as well as this VHT. Also this stuff is much less expensive and easier to apply.

Anyway, 3 hours later I move the pieces into the garage. They’re dry to the touch.

D7000_2013_08_16-19_10_14_jpg

This piece was so badly rusted that media blasting put a hole through it. Still strong at the edges though.

This piece was so badly rusted that media blasting put a hole through it. Still strong at the edges though.

Once nasty bracket now looks good. Eventually this will have its very own coat of fluidfilm.

Once nasty bracket now looks good. Eventually this will have its very own coat of fluidfilm.